I’ve written over 30 books using Scrivener software, and in this video tutorial, I show you how I use it for both fiction and non-fiction.
You can watch the video below or here on YouTube.
The video covers:
- Using template projects for fiction or non-fiction, or blank projects, which I prefer
- Drag and drop, so you can write out of order (very useful!)
- The manuscript area vs the Research area, and what to keep in each
- The Inspector — for synopsis, notes, and snapshots
- Character Lists
- Flags and icons, for organization
- Creating folders/ parts
- Project Targets and progress monitoring
- Compile to MS Word, backup, and integration with editing and formatting
I use and recommend Scrivener and my affiliate link is www.thecreativepenn.com/scrivenersoftware
If you buy through my link, I receive a percentage of sale at no extra cost to you.
You can find more tools and tutorials for writers here.
Scrivener Tutorial Transcript
[00:00:00] Hello creatives. I’m Joanna Penn from TheCreativePenn.com. And today I’m going to talk about how I use Scrivener for fiction and nonfiction books.
I have now written over 30 books with Scrivener over more than a decade. I did use MS Word for some of my early books back in 2008/2009. But with my first novel, I had such difficulty using Word, that I needed to find a solution. Once someone told me about Scrivener, I started to use it and I have used it for every single book since — fiction and nonfiction. In this tutorial, I’m going to talk a bit about how I use it.
There is so much functionality in Scrivener, so I’m only going to touch on what I use, which is definitely not everything, but it certainly gets me by.
I am an affiliate of Scrivener — my link is www.thecreativepenn.com/scrivenersoftware
Or you can just go to Literature and Latte or Google [00:01:00] Scrivener. But yes, this is my affiliate link, and I do receive a small percentage of the sale at no extra cost to you if you use my link, which, of course, I appreciate. So let’s get into the tutorial.
You can use Template Projects or a Blank Project
So, first of all, there are templates that you can use and I’ll just briefly show you them because they might be useful. I prefer to use a blank screen, but the templates might help you if you’re starting out. So you just click: File – New project and then choose what you like.
So for fiction, there are a couple examples, for nonfiction, there are even more. So let’s go into the fiction first.
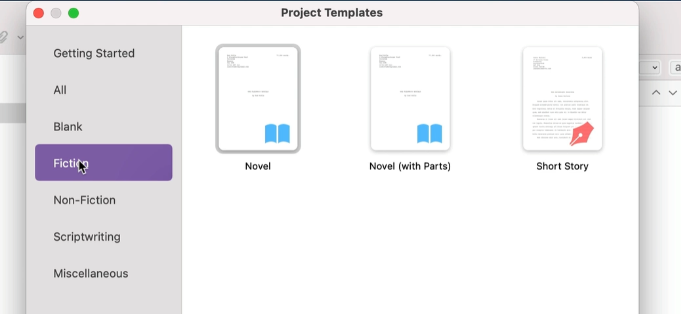
If you have never used Scrivener before, it explains how to use it using this example. So if you like a lot of help with writing a document, then this can really be useful.
For example, if you go into characters and use the little plus button here. It will give you, [00:02:00] a character sketch, and then you can fill it in. And if you like filling in all this type of thing, you can do that.
I’m a discovery writer, which I talk about in my book, How To Write a Novel, so I don’t use this, but this can be really useful if you enjoy having the different help things there. There’s a setting example.
This will help you with formatting. Although personally, I use Scrivener for writing, not formatting. I’ll talk about that towards the end.
You can write your scenes and then gather them together in chapters. You can do what you like there. Let’s just look at a nonfiction template before I get into showing you some of my own.
Here’s a nonfiction template and again, it tells you, uh, what you can do with various things.
You can put your chapters in here. You can [00:03:00] have your notes and ideas and research in different folders. But as I mentioned, I always create a blank one. So it’s just blank here.
This is how I like to use it. I like to keep things basic. This is where you put in your title. So, I’m going to call this volcano botanist, and this can be a fiction or nonfiction, depending on what you like, but I’ll just give you a few examples here.
I will often do just placeholders for scenes, because I’m a discovery writer. So let’s just put a few more in.
Drag and drop — so you can write out of order
Okay. So I’ve got a few scenes here. Now, one of the things I [00:04:00] love about Scrivener is the ability to drag and drop.
So whether you are writing fiction or nonfiction, you can essentially move them around. So you just click on it and drag it. And what that enables is for you to write out of order. So again, whether that’s fiction or non-fiction, you can just move things around.
So maybe our volcano fight scene is actually towards the end. Now, writing within you, just click over here and start writing.
I have just pasted some text from one of my other books. And you can just format this as anything else, you can change the font in the same way as you would on any other word processing document. You can change the sizing, you can change the spacing.
You can do all the usual formatting things that you want to do in the document.
Keep your research and notes within the project, but not compiled into the book
The main thing to remember with the document is that this folder contains the book. And then anything you put into [00:05:00] research, for example, is not included when you compile the book.
And again, you can type your research in, you can pull in notes and I’ll show you some examples in a minute, but I just wanted to show you how easy it is to get started.
And now let’s get into some of the more details as to how I use it. So this is one of my novels, Tomb of Relics. It is live. So it doesn’t matter that you are reading it, but you can see that there are different documents down here on the left.
And, as it’s finished, it’s all in order, but I would’ve moved those around. You can see the text here.
The Inspector includes synopsis, notes, snapshots, and more
The other important thing is the Inspector. I’m going to click the Inspector button, which is the little blue eye. And that’s going to show you some other bits and bobs that I use. So let’s just go through some of the different aspects for fiction, and then I’ll come back to nonfiction.

So, first of all, on the inspector tab, you can do an overview, a synopsis. [00:06:00] So here William de Tracy, and the Knights. This book is set in the present, but the prologue is set in 1183. So essentially this is the synopsis overview.
And the reason why this is useful, if you are a plotter, is if you click on the manuscript at the top, you can see an overview of the whole book. And so this is where you can move things around. You can write different things.
So you it’s like the digital corkboard. Some people use a physical corkboard. Some people use a digital one. So that’s super useful.
The other thing I use here is this little notes area. This is where I think about the value shift. And if you don’t know about the value shift, then you can look at The Story Grid by Shawn Coyne. But it has got to be a movement in action or some kind of positive to negative, negative to negative, or getting worse. Some change in the scene.
[00:07:00] So basically my change here is William and the others are essentially they’re banished to the Holy Land because they murdered Thomas Becket back in England. So they’re trying to serve out their time, which is a negative, but they find the Relic that they’ve been looking for, which is a positive value shift, but then there is a price to pay and that’s the negative.
So essentially by the end of the scene, we’ve moved from negative to positive, back to negative. So we know that something has happened in the scene. I write down some questions that I have and some other things that maybe the reader needs to know or that I need to know.
So the question here is, why is life the price? And we will figure that out in the whole book and also what the hell is he going to do with the heart, which is the relic that they found in the tomb. Tomb of Relics is what the book’s called. And then just a bit about his backstory. And we know that he’s one of the knights that killed Thomas [00:08:00] Becket in Canterbury.
So it’s not going to be a surprise when in chapter one, we are now in Canterbury, England and Morgan Sierra, my ARKANE secret agent is essentially coming into Canterbury because there’s been a theft of a relic. And that is in the modern day.
And again, you can see my notes. I didn’t go too much into the movement there because I don’t do it on every single chapter.
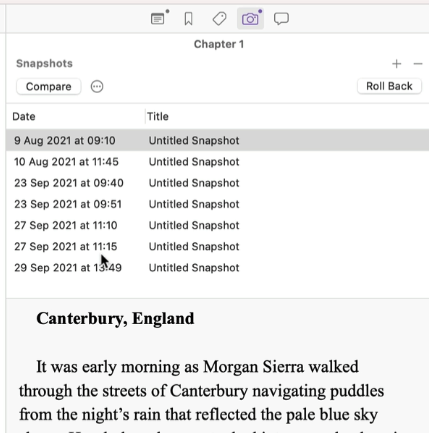
Another thing that’s useful in the inspector area is the snapshots.
It’s a little camera. This is essentially a backup of each of the versions. You can see the dates here when I wrote this. And as when I do my various edits, I take snapshots. So I know what I’m doing at the time. There were lots of other things in the inspector, but that’s basically what I use, but let’s come back over onto the other side.
Including Research in the project
And remember, you can change the sizing of all these things. So essentially down in the research area — and remember anything you put in the research area [00:09:00] is not in the final document.
So what I do is a few things here. I keep notes from books. So here are notes that I’ve written on a book called Holy Bones, Holy Dust.
And that is just notes that I write there. You can also bring in PDFs. So these are my highlights from James Herbert’s Sepulchre, which influenced the tomb and the character who’s in the tomb.
Listing characters
I also keep a list of characters. Now this is really important because sometimes you end up with characters, like I have Martin Klein, Morgan, Sierra. I probably wouldn’t do that anymore because they begin with the same letter (M).
So having a list of characters is really useful. I copy and paste some of these from the previous project, but you can see here, this is Dr. Camara Mbaye who is Senegalese French.
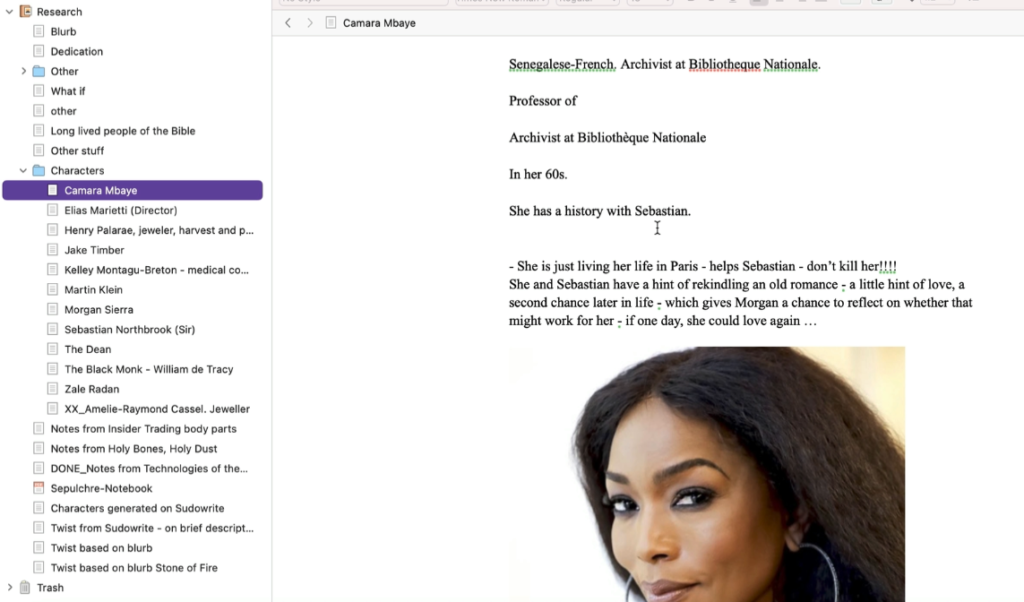
And. [00:10:00] I put here, “don’t kill her.” Oh, that’s quite funny. But essentially I put a bit about the job and her history and also I always put a picture so that it helps me with my descriptions. So Morgan Sierra, for example, is Angelina Jolie. And, uh, I always have pictures of her and I have a few notes about her in there.
So you can keep your character notes in there. I also have, for example, this is some research on long-lived people of the Bible, which relates to it. And I just have loads of other stuff in the research area.
Use flags and icons to organize the manuscript
Let’s just talk about flags. I use flags, I use most of this stuff for both fiction and nonfiction, but in terms of the flags, what I do is I turn them different colors.
So you can just right-click, and change the icon.
So one where I’m in editing, I have the chapter as yellow, then I [00:11:00] change it to a different color, say, blue once I’ve sent it to my editor. And then again, I change it once it’s done. Or for example, you can use like a pencil.

You can do color coding. I like these icons because they really help. So you might, you could use a clock for a timeline piece or something, but personally, I just kind of keep it simple, but there’s lots of things you can do with this. You can use custom icons, but that really helps to keep things organized.
So let’s have a look at a nonfiction book in progress.
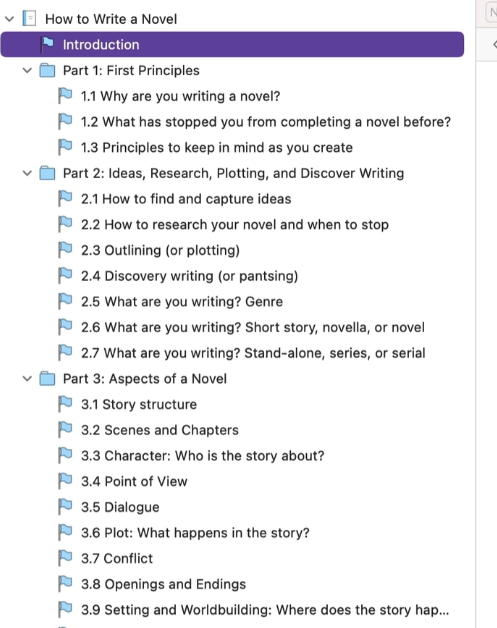
So this is actually an early version of How To Write a Novel, which is now out, but because I started writing it so long ago, I have an early Scrivener version of it and this is it.
So if you write nonfiction or fiction, you can do it either way, but essentially what I’ve done is just have completely blank things where [00:12:00] I’m like, yeah, I need to write about character. I need to write about setting and then you can come down into some of the other areas. So what is stopping you from writing? I’ve put some things in here, some quotes, for example, this chapter on genre.
You can see it’s really rough and ready during the writing process. So, and this is how my novels look, too. Quite disorganized, quite all over the place.
But then here I’ve said, all right, mindset, I’ve got a purple flag, which means there’s more in there. And this is actually a transcript from my course on How to Write a Novel.
So essentially I know I have to go through this in some way, but again, just showing you the drag and drop. So if I decide to move mindset, I can move it up there just by dragging and dropping.
So that’s an early version of how to write a novel, the nonfiction. [00:13:00] And this is the finished version of how to write a novel.
Again, you can see, I use snapshots to do the different edits and changes. I’m going to just close the inspector there, but essentially you can see in the writing, it’s exactly the same as the fiction.
You do all the formatting in there, whatever you want to do, you change the icons to be whatever you want it to be.
So that’s essentially how I do my fiction and and non-fiction.
Creating folders / parts for non-fiction
Now to do the parts. You just do this little dropdown, you can do folder, you can do part six or whatever. Part five. And then under there you can create a new text document. So I like doing parts for nonfiction because it organizes the book into different things.
You can do that for fiction too, if you like, and then just scrolling down here, you can see down in my research area, I’ve got various things that I have put down there [00:14:00] and what’s nice is, again, if you select something as you are going through, you can use Move to, and you can move things to different places.
So these are all the things that I rejected, I moved them all down into the bottom there. You can organize your documents as much as you like.
Project Targets
So I’ll just show you some of the other things that I like to use. First of all, is the project targets. So here you can set a target for your words. Let’s say I want to do 70,000 words on this book.
And what I can then do is I can actually change the date. So obviously I started this a while ago.
But let’s say I want to finish by the 30th of August, 2022. And as I record this, there’s 39 days left. So if I do 309 words a day, I will hit my target of [00:15:00] 70,000.
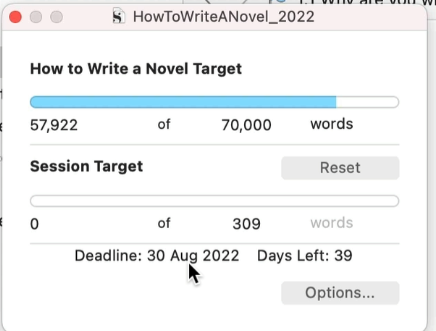
Now again, you can use this for fiction and nonfiction. What I can also do is I can say. When I write, so I can say, okay, I’m writing five days a week, or maybe you are only writing four days a week and you can essentially change that. And then it’s like, okay, we need to write a bit more. So this is really, I find this really useful.
And then every day you write it will move up and it’ll tell you whether you’ve hit it and it’ll turn green, which is super nice.
Compile to MS Word, Save Draft, Back up every session
So one of the important things that I do, every single writing session is compile and back up my files.
So you can save Scrivener to wherever you save files. I use Dropbox, but what I also do as well as saving on Dropbox is I compile and export my whole project every day. Well, even twice a day, if I have two writing sessions, if you go to File – Compile.
It might look a little complicated, but again, you can just use the default. So I’m going to [00:16:00] compile for Microsoft Word and all the little flags here are saying what I want to compile. And essentially I’m going to I’ll stick those on as well in my appendices. So you can say, yeah, I want all of these things. You can filter it if you don’t want everything.
But all I do every day is export the complete manuscript, everything I’ve written, and I just keep it every single day.
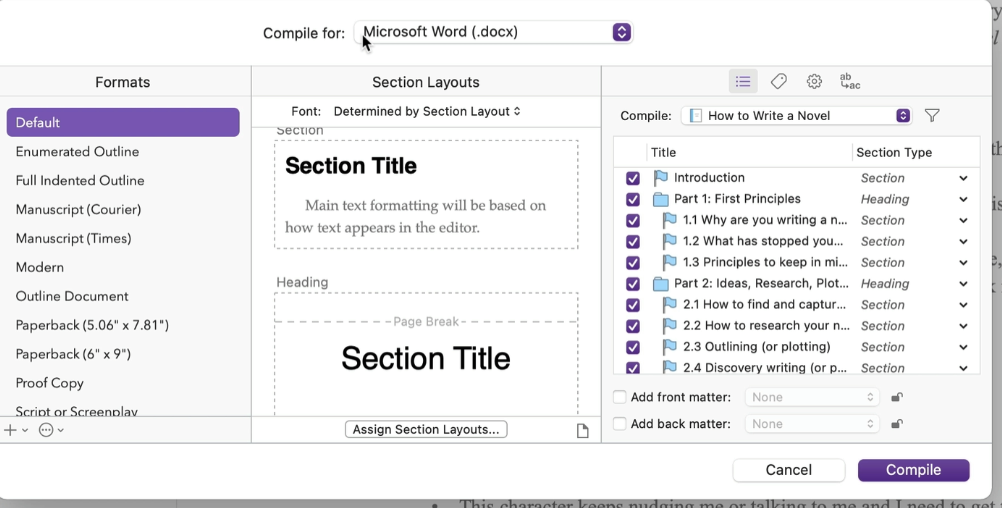
So I click Compile. It will ask me to save it somewhere. And I always have a draft folder and I add the date.
And then I might, if I do two writing sessions, I might have A, I might have B on the end.
So this for me is my draft for today. And I’ll export that and you can see there, it will export. This is my draft folder for how to write a novel. You can see that it has plenty of different drafts in, so I can just open this one and you can see it is essentially the book.
[00:17:00] Now you can send that to your editor. You can do whatever you like, but personally, I back my writing sessions up every day, sometimes twice a day, whenever I change the file.
So this document is also what you can use for your editing process. You can also use this for formatting.
So personally, I use Scrivener with ProWritingAid for my editing process, which I’ve explained in my ProWritingAid tutorial.
And while you can use Scrivener to format for eBooks and print books, I use Vellum for my formatting and I’ve recorded another tutorial on formatting with Vellum (Mac only) about that as well. [More formatting options here.]
So I hope you’ve enjoyed just a little glimpse of how I use Scrivener, but if you go and download a free version, you can try it out yourself.
My link is TheCreativePenn.com/scrivenersoftware. And if [00:18:00] you need more help, they have a forum there. They have ways to contact them. And there are lots more tutorials online as well. So I hope you found this useful — and happy writing!
The post How I Use Scrivener For Fiction And Non-Fiction first appeared on The Creative Penn.
Go to Source
Author: Joanna Penn